2008/03/27
조인시 위키: GWT Example 프로젝트 - Hello World
조인시 위키: GWT Example 프로젝트 - Hello World: "Hello World의 GWT 버젼을 만들어 보도록 하겠다."
참고 : http://code.google.com/webtoolkit/documentation/examples
보내는 사람 Google이글을 읽기전에 먼저 GWT Overview, GWT시작하기, GWT FAQ문서를 읽어보기 바란다.
여기에서는 Hello World의 GWT 버젼을 만들어 보도록 하겠다. 위의 문서들을 읽어 봤다면, 쉽게 이해할 수 있을 것이다.
우선 projectCreator을 이용해서 프로젝트를 생성하도록 한다.$ ./projectCreator -eclipse HelloWorld
Created directory ./gwt-linux-1.2.22/HelloWorld/src
Created directory ./gwt-linux-1.2.22/HelloWorld/test
Created file ./gwt-linux-1.2.22/HelloWorld/.project
Created file ./gwt-linux-1.2.22/HelloWorld/.classpath
이제 applicationCreator을 이용해서 GWT응용을 생성한다. $ ../applicationCreator -eclipse HelloWorld com.joinc.client.HelloWorld
Created directory ./gwt-linux-1.2.22/HelloWorld/src/com/joinc
Created directory ./gwt-linux-1.2.22/HelloWorld/src/com/joinc/client
이제 eclipse를 실행시키고 프로젝트를 import 해와서 HelloWorld.java를 수정하면 된다. package com.joinc.client;
import com.google.gwt.core.client.EntryPoint;
import com.google.gwt.user.client.ui.Button;
import com.google.gwt.user.client.ui.ClickListener;
import com.google.gwt.user.client.ui.Label;
import com.google.gwt.user.client.ui.RootPanel;
import com.google.gwt.user.client.ui.Widget;
import com.google.gwt.user.client.Window;
public class HelloWorld implements EntryPoint
{
public void onModuleLoad() {
Button b = new Button("Click me", new ClickListener() {
public void onClick(Widget sender) {
Window.alert("Hello World!!");
}
});
RootPanel.get().add(b);
}
}
코딩이 끝났다면 eclipse의 debug기능을 이용해서 호스트모드에서 성공적으로 작동되는지 확인한다.
호스트모드에서 성공적으로 작동되는걸 확인했다면, 마지막으로 java-to-javascript컴파일러를 이용해서, HTML & Javascript를 생성해내고 웹서버를 통해서 테스트한다. $ ./HelloWorld-compile
Output will be written into ./www/com.joinc.HelloWorld
Copying all files found on public path
Compilation succeeded
테스트
GWT Widget 소개 및 테스트
#title GWT Widget 소개 및 테스트
[[TableOfContents]]
[[tag(google,GWT,eclipse)]]
=== 기본제공 Widget ===
GWT는 '''웹 사용자 인터페이스'''를 위한 몇개의 위젯을 제공한다. 이들 위젯은 Swing이나 SWT(:12)와 비슷한 프레임워크 구조를 가진다. 즉 위젯을 포함할 수 있는 위젯인 Layout위에 버튼, Box, Tree 등을 놓는 구조다.
다음은 GWT에서 제공하는 위젯들이다.
{{{#!html
}}}
[[sadsense(center)]]
=== 확장 Widget ===
GWT는 20개 정도만의 위젯을 제공하고 있는데, 웹 유저 인터페이스의 구성을 위해서는 턱없이 적은 숫자다. 그러나 다행히도 GWT는 쉽게 사용자 정의 위젯을 추가할 수 있는 방법을 제공하고 있다. 실제로 이미 많은 수의 위젯들이 공개되어 있다. 공개된 위젯 중 일부를 소개한다.
{{{#!html
}}}
=== 외부 Wiget Library 테스트 ===
외부 위젯라이브러리를 어떻게 추가시킬 수 있는지 확인하기 위해서, [http://code.google.com/p/gwt-html-editor gwt-html-editor]의 RitchEditor를 받아서 테스트해보기로 했다.
우선 위 사이트에 가서 '''editor'''의 최신버전을 얻어오도록 하자. 현재 (2006-12-23)최신버젼은 editor-0.1.1-preview.jar 이다. 얻어온 jar 파일은 적당한 클래스 경로에 두도록 한다.
다음과 같은 방법으로 프로젝트를 생성하자. 프로젝트의 이름은 '''RitchTest'''로 했다.
{{{#!plain
# ./projectCreator -eclipse RitchTest
# ./applicationCreator -eclipse RitchTest com.joinc.client.RitchTest
}}}
이제 eclipse(:12)를 실행시킨다음 RitchTest를 import해와서, RitchTest를 다음과 같이 수정한다.
{{{#!plain
package com.joinc.client;
import com.google.gwt.core.client.EntryPoint;
import com.google.gwt.user.client.Window;
import com.google.gwt.user.client.ui.Button;
import com.google.gwt.user.client.ui.ClickListener;
import com.google.gwt.user.client.ui.LoadListener;
import com.google.gwt.user.client.ui.RootPanel;
import com.google.gwt.user.client.ui.Widget;
import com.jpavel.gwt.wysiwyg.client.Editor;
/**
* Entry point classes define
*/
public class RitchTest implements EntryPoint {
public void onModuleLoad() {
buildSamplePage();
}
public void buildSamplePage() {
final Editor editor = new Editor();
editor.addLoadListener(new LoadListener() {
public void onLoad(Widget sender) {
// 적당한 코드를 입력
}
public void onError(Widget sender) {
// 적당한 코드를 입력
}
});
editor.setWidth("100%");
editor.setHeight("300px");
editor.load();
Button button = new Button("Get HTML");
button.addClickListener(new ClickListener() {
public void onClick(Widget sender) {
Window.alert(editor.getHTML());
}
});
RootPanel.get().add(editor);
}
}
}}}
src/com/joinc/RitchTest.gwt.xml 파일을 열어서, 모듈을 추가시켜 준다.
{{{#!plain
}}}
마지막으로 '''RitchTest-compile'''에 editor-0.1.1-preview.jar 의 경로를 추가시키도록 한다.
{{{#!plain
#!/bin/sh
APPDIR=`dirname $0`;
java -cp "$APPDIR/src:...:/work/dir/editor-0.1.1-preview.jar" \
com.google.gwt.dev.GWTCompiler -out "$APPDIR/www" "$@" com.joinc.RitchTest;
}}}
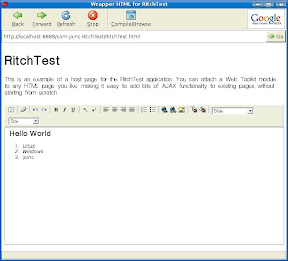
다음은 eclipse에서 호스트모드 브라우저를 통해서 디버깅한 모습이다.
{{{#!html
}}}
'''java-to-javascript'''를 이용해서 컴파일 한 후, 사이트에 올린 결과다. [http://www.joinc.co.kr/GWT/RitchTest/RitchTest.html 테스트]해보기 바란다.
=== 맺음말 ===
GWT가 Java기술을 사용함으로 개발자는 다음과 같은 이득을 얻을 수 있다.
* 객체지향적인 재사용가능한 코드 생성
* 손쉬운 배포 및 문서화
GWT를 이용하면 브라우저 호환성이 의심되는 관리하기도 까다로운 난잡한 HTML&Javascript 코드를 직접제어 하는 것보다, 깔끔한 환경을 제공해 줌을 알 수 있을 것이다. 웹응용 개발도, 윈도우응용 처럼 각각의 컴포넌트를 가져다 붙이는 식의 개발이 가능할 때가 도래하지 않을까 싶다.
이미 GWT를 이용한 비쥬얼한 개발이 가능한 eclipse 플러그인도 제공되고 있다. 아직 완성도가 떨어지긴 하지만 관심이 있다면 아래의 사이트를 방문해 보기 바란다.
* http://download.instantiations.com/DesignerDoc/integration/latest/docs/html/gwt/rich_editing_experience.html
=== 할일 ===
* 사용자 정의 위젯의 생성및 등록
* GWT 기본제공 위젯을 사용한 복잡한 UI구성
=== 참고문헌 ===
* [http://google.wikia.com/wiki/Google_Web_Toolkit wikipedia Google Web Toolkit]
* [http://code.google.com/webtoolkit/documentation/com.google.gwt.doc.DeveloperGuide.UserInterface.WidgetGallery.html code.google.com Gwt Widget 갤러리]
'''문서가 도움이 되었나요?'''
[[Vote(아주 많이 3, 많이 1, 그럭저럭 1, 별로 0, 전혀 1)]]
[[tag(google,GWT,eclipse)]]
[[TableOfContents]]
[[tag(google,GWT,eclipse)]]
=== 기본제공 Widget ===
GWT는 '''웹 사용자 인터페이스'''를 위한 몇개의 위젯을 제공한다. 이들 위젯은 Swing이나 SWT(:12)와 비슷한 프레임워크 구조를 가진다. 즉 위젯을 포함할 수 있는 위젯인 Layout위에 버튼, Box, Tree 등을 놓는 구조다.
다음은 GWT에서 제공하는 위젯들이다.
{{{#!html
| Button | RadioButton |
 |  |
| CheckBox | TextBox |
 |  |
| PasswordTextBox | TextArea |
 |  |
| Hyperlink | ListBox |
 |  |
| MenuBar | Tree |
 |  |
| Table | TabBar |
 |  |
| DialogBox | PopupPanel |
 |  |
| StackPanel | HorizontalPanel |
 |  |
| VerticalPanel | FlowPanel |
 |  |
| DockPanel | TabPanel |
 |  |
}}}
[[sadsense(center)]]
=== 확장 Widget ===
GWT는 20개 정도만의 위젯을 제공하고 있는데, 웹 유저 인터페이스의 구성을 위해서는 턱없이 적은 숫자다. 그러나 다행히도 GWT는 쉽게 사용자 정의 위젯을 추가할 수 있는 방법을 제공하고 있다. 실제로 이미 많은 수의 위젯들이 공개되어 있다. 공개된 위젯 중 일부를 소개한다.
{{{#!html
| Widget | Description | Library / Homepage | License |
|---|---|---|---|
| Login Panel | A widgets that provides controls relevant to a login prompt | GWT-Stuff | Apache License |
| Rich Text Area | Another WYSIWYG HTML Editor with font, color, link ... features | GWT Widgets | LGPL |
| Rich Text Editor | A WYSIWYG HTML Editor. | GWT Addons | LGPL or Apache 2.0 |
| HTML (Rich Text) Editor | WYSIWYG HTML (Rich Text) Editor Widget | HTML (Rich Text) Editor Widget | Apache 2.0 |
| Image Button | A Image Button with Tooltip. CSS L&F for default, roll over and pressed. | GWT Addons | LGPL or Apache 2.0 |
| Tooltip | A real tooltip that show after a second on the mouse position. | GWT Addons | LGPL or Apache 2.0 |
| FileUploadField | A file upload form field widget. | GWT Widget Library | LGPL |
| FormPanel | An HTML form widget. | GWT Widget Library | LGPL |
| ImageButton | Use an image as a button. | GWT Widget Library | LGPL |
| OptionList | A ListBox extension. | GWT Widget Library | LGPL |
| PNGImage | Image widget that overcomes PNG browser incompatabilities. | GWT Widget Library | LGPL |
| RoundedPanel | Rounded corners like GMail | gwt.bouwkamp.com | Apache License 2.0 |
| Canvas Widget | A Graphics Widget | GWT Component Library | LGPL 2.1 |
| Round Corners | Border with round corners | GWT Component Library | LGPL 2.1 |
| Simple Calendar | A embedded calendar | GWT Component Library | LGPL 2.1 |
| RateIt Control | RateIt widget similar to netflix.com, and amazon.com star ratings. You can use mouse and keyboard (left, right, and number keys) to select rating. | GWT Component Library | LGPL 2.1 |
| Script.aculo.us Effects Integration | This component allows you to use Script.aculo.us effects from GWT. | GWT Component Library | LGPL 2.1 |
| Auto-Completion Textbox | A textbox that has a list of string values that will be automatic completed on edit the text. | GWT Component Library | LGPL 2.1 |
| Simple XML Parser | Allows to parse XML with GWT | GWT Component Library | LGPL 2.1 |
| Hyperlink with Image | Hyperlink which allows you to specify Image object as its content. Go ahead, implement your favority rollover effects with it. | GWT Component Library | LGPL 2.1 |
| Tooltip Listener | Allows you to add tooltips (small help messages) to any component that support SourcesMouseEvents interface. | GWT Component Library | LGPL 2.1 |
| Simple Date Picker | A text box and a popup calendar. | Parvinder Thapar | LGPL 2.1 |
| Sortable Table Widget | Client-side sorting of the Table | Parvinder Thapar | LGPL 2.1 |
| GoogleMaps | A widgets that support the Google Map API | GWT - Custom Components | Apache License |
| FlashPlayer | A widget to play flash movies. | GWanTed | LGPL |
| LegendPanel | A widget to layout widgets in a legend way. | GWanTed | LGPL |
| HttpRequestExt | To do sync HTTPRequest downloads. | GWanTed | LGPL |
| Navigator | A simple wrapper for the navigator DOM object. | GWanTed | LGPL |
| ExternalHyperlink | Allow you to use external hyperlinks. | GWanTed | LGPL |
| AbstractJavascriptClass | This class is a base class that let wrap a javascript object in an external javascript file in a GWT class. | GWanTed | LGPL |
| ToolItem | An ImageButton widget alternative. | GWanTed | LGPL |
| RowPanel | Think VerticalPanel with more layout flexibilty. | GWT Tk | Apache 2.0 |
| ColumnPanel | Think HorizontalPanel with more layout flexibilty. | GWT Tk | Apache 2.0 |
| DropDownPanel | An expandable panel with a header like "Labels" in Gmail. | GWT Tk | Apache 2.0 |
| SimpleHyperLink | A simple anchor widget. No DIV messing up text flow, no history tokens added to the location field. | GWT Tk | Apache 2.0 |
| GlassPanel | A stylable panel which preventa interaction with the entire document ("light box" effect). | GWT Tk | Apache 2.0 |
| ModalDialog | A modal dialog featuring focus containment, "light box" effect, automatic centering and more. | GWT Tk | Apache 2.0 |
| AlertDialog | A modal dialog tailored to conveniently displaying alert messages. | GWT Tk | Apache 2.0 |
}}}
=== 외부 Wiget Library 테스트 ===
외부 위젯라이브러리를 어떻게 추가시킬 수 있는지 확인하기 위해서, [http://code.google.com/p/gwt-html-editor gwt-html-editor]의 RitchEditor를 받아서 테스트해보기로 했다.
우선 위 사이트에 가서 '''editor'''의 최신버전을 얻어오도록 하자. 현재 (2006-12-23)최신버젼은 editor-0.1.1-preview.jar 이다. 얻어온 jar 파일은 적당한 클래스 경로에 두도록 한다.
다음과 같은 방법으로 프로젝트를 생성하자. 프로젝트의 이름은 '''RitchTest'''로 했다.
{{{#!plain
# ./projectCreator -eclipse RitchTest
# ./applicationCreator -eclipse RitchTest com.joinc.client.RitchTest
}}}
이제 eclipse(:12)를 실행시킨다음 RitchTest를 import해와서, RitchTest를 다음과 같이 수정한다.
{{{#!plain
package com.joinc.client;
import com.google.gwt.core.client.EntryPoint;
import com.google.gwt.user.client.Window;
import com.google.gwt.user.client.ui.Button;
import com.google.gwt.user.client.ui.ClickListener;
import com.google.gwt.user.client.ui.LoadListener;
import com.google.gwt.user.client.ui.RootPanel;
import com.google.gwt.user.client.ui.Widget;
import com.jpavel.gwt.wysiwyg.client.Editor;
/**
* Entry point classes define
onModuleLoad().*/
public class RitchTest implements EntryPoint {
public void onModuleLoad() {
buildSamplePage();
}
public void buildSamplePage() {
final Editor editor = new Editor();
editor.addLoadListener(new LoadListener() {
public void onLoad(Widget sender) {
// 적당한 코드를 입력
}
public void onError(Widget sender) {
// 적당한 코드를 입력
}
});
editor.setWidth("100%");
editor.setHeight("300px");
editor.load();
Button button = new Button("Get HTML");
button.addClickListener(new ClickListener() {
public void onClick(Widget sender) {
Window.alert(editor.getHTML());
}
});
RootPanel.get().add(editor);
}
}
}}}
src/com/joinc/RitchTest.gwt.xml 파일을 열어서, 모듈을 추가시켜 준다.
{{{#!plain
}}}
마지막으로 '''RitchTest-compile'''에 editor-0.1.1-preview.jar 의 경로를 추가시키도록 한다.
{{{#!plain
#!/bin/sh
APPDIR=`dirname $0`;
java -cp "$APPDIR/src:...:/work/dir/editor-0.1.1-preview.jar" \
com.google.gwt.dev.GWTCompiler -out "$APPDIR/www" "$@" com.joinc.RitchTest;
}}}
다음은 eclipse에서 호스트모드 브라우저를 통해서 디버깅한 모습이다.
{{{#!html
 |
| 보내는 사람 Google |
}}}
'''java-to-javascript'''를 이용해서 컴파일 한 후, 사이트에 올린 결과다. [http://www.joinc.co.kr/GWT/RitchTest/RitchTest.html 테스트]해보기 바란다.
=== 맺음말 ===
GWT가 Java기술을 사용함으로 개발자는 다음과 같은 이득을 얻을 수 있다.
* 객체지향적인 재사용가능한 코드 생성
* 손쉬운 배포 및 문서화
GWT를 이용하면 브라우저 호환성이 의심되는 관리하기도 까다로운 난잡한 HTML&Javascript 코드를 직접제어 하는 것보다, 깔끔한 환경을 제공해 줌을 알 수 있을 것이다. 웹응용 개발도, 윈도우응용 처럼 각각의 컴포넌트를 가져다 붙이는 식의 개발이 가능할 때가 도래하지 않을까 싶다.
이미 GWT를 이용한 비쥬얼한 개발이 가능한 eclipse 플러그인도 제공되고 있다. 아직 완성도가 떨어지긴 하지만 관심이 있다면 아래의 사이트를 방문해 보기 바란다.
* http://download.instantiations.com/DesignerDoc/integration/latest/docs/html/gwt/rich_editing_experience.html
=== 할일 ===
* 사용자 정의 위젯의 생성및 등록
* GWT 기본제공 위젯을 사용한 복잡한 UI구성
=== 참고문헌 ===
* [http://google.wikia.com/wiki/Google_Web_Toolkit wikipedia Google Web Toolkit]
* [http://code.google.com/webtoolkit/documentation/com.google.gwt.doc.DeveloperGuide.UserInterface.WidgetGallery.html code.google.com Gwt Widget 갤러리]
'''문서가 도움이 되었나요?'''
[[Vote(아주 많이 3, 많이 1, 그럭저럭 1, 별로 0, 전혀 1)]]
[[tag(google,GWT,eclipse)]]
| Button | RadioButton |
| | <img class='gallery' src='http://code.google.com/webtoolkit/documentation/RadioButton.png'" |
톰켓 설치 및 eclipse 내에서 톰켓 설정
톰켓 설치 및 eclipse 내에서 톰켓 설정
톰켓 설치 및 eclipse 내에서 톰켓 설정
조회수: 337, 2007.09.27 18:37:03
게시글 주소 : http://www.igotit.co.kr/zbxe/1065
엮인글 주소 : http://www.igotit.co.kr/zbxe/1065/47d/trackback
아나킨
일단 톰켓을 설치하기 위해서는 톰켓을 받아야 겠죠 지금 톰켓 버전이 6.x까지 나왔는데.. 여기서는
5.x를 설치하는 것을 보여 드리도록 하지요...
다운로드 사이트 ---> http://tomcat.apache.org/ 이 사이트에 보면 왼쪽 메뉴에 Download 부분이 있습니다..
여기서 Tomcat5.x를 클릭합니다...
클릭하면 다음페이지에서 위 그림과 같은 부분을 찾으세요..
이부분을 찾았으면 Core에 Windows Service installer 부분을 클릭하여 다운받습니다..
받은 파일을 실행하면 위의 화면이 뜸니다.. 여기서 Next누름니다..
여기서 I Agree 를 클릭합니다.
Custom을 선택하고 체크 박스 부분을 모두 체크해 주세요...
설치 폴더 경로를 위와 같이 설정해 줍니다.. 그리고 Next를 눌러 줍니다..
기본 port는 8080으로 되어있으나.. 저는 오라클이 깔려 있는 관계로 8181로 하였습니다..
admin password는 기억하기 쉬운걸로 적어 주시면 됩니다.. 다 적어 주셨으면 Next를 눌러 줍니다..
참고로 톰켓을 깔기 전에 자바가 깔려져 있어야 합니다. 자바가 깔려져있는 곳에 jre 부분을 선택하는
부분입니다. 자바가 깔려져 있다면 가쁜히 install을 눌러 줍니다.
여기서 Finish를 눌러 줍니다.
이제 톰켓 설치는 끝났습니다.. 이제 톰켓 설정하는 부분을 보여 드리겠습니다.. 우선 톰켓 설정은 작업표시줄 오른쪽에 톰켓 아이콘이
있다면 그것을 더블 클릭하거나 오른쪽클릭하여 configure를 클릭합니다. 작업트레이에 없다면 C:\Tomcat 5.5\bin\tomcat5w.exe
위의 경로로 들어가 tomcat5w.exe를 실행시키면 설정창이 나옵니다.
설정에서 톰켓이 Start 되어 있다면 Stop을 눌러 멈추어 줍니다. 그리고 확인을 눌러 줍니다.
이것이 다 되었다면 환경 변수를 설정하겠습니다.
시스템 등록 정보 -> 환경변수 -> 시스템변수 ->새로 만들기에서 위와 같이 설정합니다. 참고로 변수값은 자바가 깔린 폴더의 경로와
톰켓이 깔린 경로를 설정해 줍니다.
이제 기본적인 톰켓 설정은 끝났습니다. 이제 이클립스에서 톰켓을 설정하는 것을 보여드리면 끝나네요.. 이거 은근히 힘드네요.ㅠㅠ
일단 이클립스에서 톰켓을 사용하기 위해서는 플러그인을 설치해야합니다.
톰켓 플러그인은 http://www.eclipsetotale.com/tomcatPlugin.html 여기서 받으면 됩니다.여기서 최신버전으로 받으세요.
참고로 이클립스 HTML 에디터 플러그인 https://sourceforge.jp/projects/amateras/files/ 여기에서 받으세요
그럼 받은 플러그인을 어떻게 하는가 하면 압축을 풀어 이클립스 폴더 안에 plugins풀더에 붙여 넣기 해줍니다.
여기까지 다 되었다면 이클립스를 실행시킵니다. 실행시켜 보면 고양이 3마리가 생겼을 겁니다.
위의 그림처럼 고양이가 생긴다.
그리고 메뉴에 window -> preference->tomcat 으로 간다.
그리고 밑에 그림처럼 설정한다.
tomcat home에는 tomcat이 깔린 폴더를 설정한다. 그리고 ok를 누른다.
설정을 다했다면 고양이를 클릭해서 톰켓을 실행시킨다. 그다음 지구본을 클릭하여 http://localhost:8181/를 입력하여
톰켓 페이지가 나오는지 확인한다. 톰켓 페이지가 나온다면 성공적으로 톰켓 설정이 끝난 것이다.
길게 주절주절 적어 보았습니다. 헐.. 이거 참 오래 걸렸네요. 헐.. connection pool 사용할때 설정은 다음 기회에
올리도록 하죠.. 그럼 이만.
피드 구독하기:
글 (Atom)